

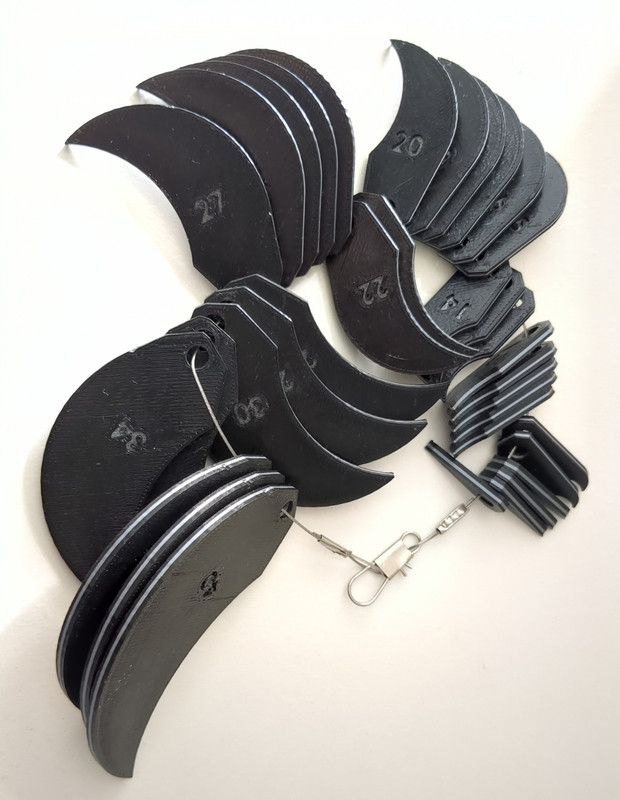
A set of radius gauges from 1mm to 40mm have been one of the tools I use the most for functional print design.
I tried several different ways of organizing these. Pictured is a small cheap fishing line leader. This is the only useful way to do radius gauges in practice. They stay together and in order, while having the freedom to fit into and around tight spots. I tried rigid mounting to a body like a pocket knife, a single threaded rod through all, and a loose organizer. These are all terrible ideas in practice.
Find or design this same style pictured. I think I got these from thingiverse, (one of the only things I still have that I did not design myself). Slice the file like I did with a color change going from dark to light to dark filaments. You can set a manual color change in the slicer settings. You do not need a special machine for this. Use neutral colors for the gauges. This makes it easy to spot the tiny gap when the inner or outer radius are not quite perfectly matched to your part. You also need the numbers debossed in negative into the print so that they resolve well enough and do not get in the way. Note that these have the same inner and outer radius on each part so they can be used to measure either. PLA is preferred to avoid warping and use dried or fresh material. Do a proper calibration before printing these. Do all the things knowing that this is one tool you’ll use for many years.
Guess this works, but only if you trust your 3D printers precision
It is not difficult to test for accuracy using a compass and paper.
If you design these yourself, accuracy does not matter. You are matching the CAD/Slicer/Printer with what should be repeatable precision. If your #5 radius gauge fits the real world part and matches your CAD/Slicer settings that generated the tool, the fact the tool is not absolutely 5mm has no bearing on the outcome.
The design of all hobby printers is targeting open loop precision with no consideration for accuracy. This is why IDEX is so hard; because the accurate location of both print heads becomes critical. The accuracy problem has been solved long ago with closed loop control, but this is pricey compared to open loop machines. These printers are only precision machines. The only time it is worth calibrating for accuracy is when you need to transfer design files for someone else to print on a different machine. I don’t share most of my designs because accuracy is a waste of time. I can use a unit test print, alter my design to compensate, and have a perfect part much faster than fussing with accuracy.
Now that I think about it it makes sense from this perspective.
I would really hope your printer can produce radii to 1mm tolerance. Especially for the higher end of sizes.
This is a great suggestion. I don’t know why I’ve not done this before now. Everything I design has a radius on it and I’ve been doing it the hard way.


